Solana development 101: Building a calculator using Solana programs
Welcome to the Solana crypto-currency quest. With this quest you’ll get upto speed with the most rapidly rising blockchain in the market: Solana. It would be awesome if you know a bit of Rust (or even C++ concepts) already and are familiar with how blockchains work, but even if you do not have any specific background of Rust or Solana development, we will have all bases covered. If you have a high level of interest and motivation, we should be good to go ahead.
In this quest, we will be developing a simple calculator on the Solana blockchain. This essentially means that once you are done with this quest, you will be well versed with the basics of development on the Solana blockchain using the Anchor framework and would be much better equipped to take on the other Solana quests.
Setting up the Environment:
There are a few things that we need to get up and running before we move forward in this quest. Before we move forward make sure you’ve a working NodeJS environment set up. We need rust, Solana, Mocha(a JS testing framework), Anchor and Phantom wallet for this quest. To install rust, run
curl --proto '=https' --tlsv1.2 -sSf https://sh.rustup.rs | sh
source $HOME/.cargo/env
rustup component add rustfmt
To install Solana, run
sh -c "$(curl -sSfL https://release.solana.com/v1.8.0/install)"
To install mocha globally, run
npm install -g mocha
Now we’ll be installing Anchor. If you’re on a linux system, run
# Only on linux systems
npm i -g @project-serum/anchor-cli
Fair Warning : If you are using a Windows system, we highly suggest using WSL2 (Windows sub-system for Linux) or switching to a Linux environment. Setting up WSL is also quick and easy. A good walk-through can be found here For any other OS, you need to build from source. Run the following command
cargo install --git https://github.com/project-serum/anchor --tag v0.17.0 anchor-cli --locked
To verify that Anchor is installed, run
anchor --version

Since Solana is still a pretty new blockchain compared to the establised ones out there, it’s developer tooling too is pretty limited and cumbersome as of now. However, it is rapidly improving and it does so on a daily basis. At the forefront of this development is Anchor, by Armani Ferrante. You can think of it like the Ruby on Rails framework for Ruby, that means yes, you can develop things on vanilla Ruby, but Ruby on Rails makes your life much much easier, right? That’s the same with Anchor and Solana development. Anchor is the Hardhat of Solana development plus much more. It offers a Rust DSL (basically, an easier Rust) to work with along with IDL, CLI and workspace management. Anchor abstracts away a lot of potential security holes from a conventional Solana program, takes care of the serialization and deserialization, reduces large boilder-platey code to macros and lot of other good good stuff.
Running configurations on Solana CLI
The first command you should run on your terminal (assuming Solana CLI was properly installed in the last quest) is:
solana config get
This should throw up a result similar to something like:

If you didnot set up your keypair earlier, then you won’t be having the Keypair Path in your results. To set that up, follow the instructions over here
We would want to remain on the local network for building our program and later shift to the devent or mainnet-beta if required. If the RPC URL field of your last result did not show localhost, you can set it to localhost using the following command:
solana config set --url localhost
Next, we would want to know our account/wallet address and airdrop some SOL tokens into it, to handle all the deployment, transactions etc costs that come with interacting with and using a Solana program. To do that first let’s find our address. The command to do that is:
solana address
This would result into something like this:

Then, for more comprehensive details of your account, use the following command with the address that you got from the last command
solana account <your address from the last command>
This would result into something like this:

Next, we want to spin up our local network. Think of this local network as a mock Solana blockchain running on your own single system. This network would be required for development and testing of our program. To spin it up, in a separate tab, use the following command:
solana-test-validator
Once you get an image, like the one below, you know that your local validator (local network) is now up and running

Now, our last task is to top up our account with some SOL, which you can do by using:
solana airdrop 100
This should result in something like:

Setting up our Anchor project
In this sub-quest all we would do is initialize an Anchor project and see whether everything’s there and working fine or not and after move on ahead to make our own changes. Head over to your preferred destination for the project using your terminal and then type the following command:
anchor init mymoneydapp

cd mycalculatordapp
This would result in a screen somewhat similar to this:

First we check whether we can see the programs, app, programs, migrations directory among others or not. If we can, we would head over to programs/messengerapp/src/lib.rs to see the default program that Anchor provides us. This is the most basic example possible on Anchor and what’s happening here is simply that a user-defined function Initialize whenever called would successfully exit the program. That’s all, nothing fancy. Now, let’s try to compile this program using the following command:
anchor build
This would trigger a build function and would something like this upon completion:

This build creates a new folder in your project directory called, target. This target folder contains the idl directory, which would also contain the idl for our program. The IDL or Interface Description Language describes the instructions exposed by the contract and is very similar to ABI in Solidity and user for similar purposes, ie, for tests and front-end integrations. Next, we can move onto testing this program, so that we can get familiar with how testing is done in Anchor. Head to tests/messengerapp.js. Here, you’ll see a test written in javascript to interact and test the default program. There are a lot of things in the test, that may not make sense to you right now, but stick around and we’ll get to those shortly. The test would look something like this:

Next, to actually run these tests, first head over to the tab where you ran the solana-test-validator command and kill that process (using Ctrl-C). Now, use the following command:
anchor test
The passing tests should result in the following screen:

Now, let’s head over to the programs directory and start importing some cool Rust crates provided by Anchor which will help us build our calculator app.
Defining our programs
Head over to programs/mycalculatordapp/src/lib.rs and clear the code written there apart from the boilerplate code written over there. After clearing, your coding screen should look something like this:

You can also copy paste the below code to get started (assuming that you’ve also named your project as mycalculatordapp)
use anchor_lang::prelude::*;

declare_id!("Fg6PaFpoGXkYsidMpWTK6W2BeZ7FEfcYkg476zPFsLnS");

#[program]
pub mod mycalculatordapp {
    use super::*;

}
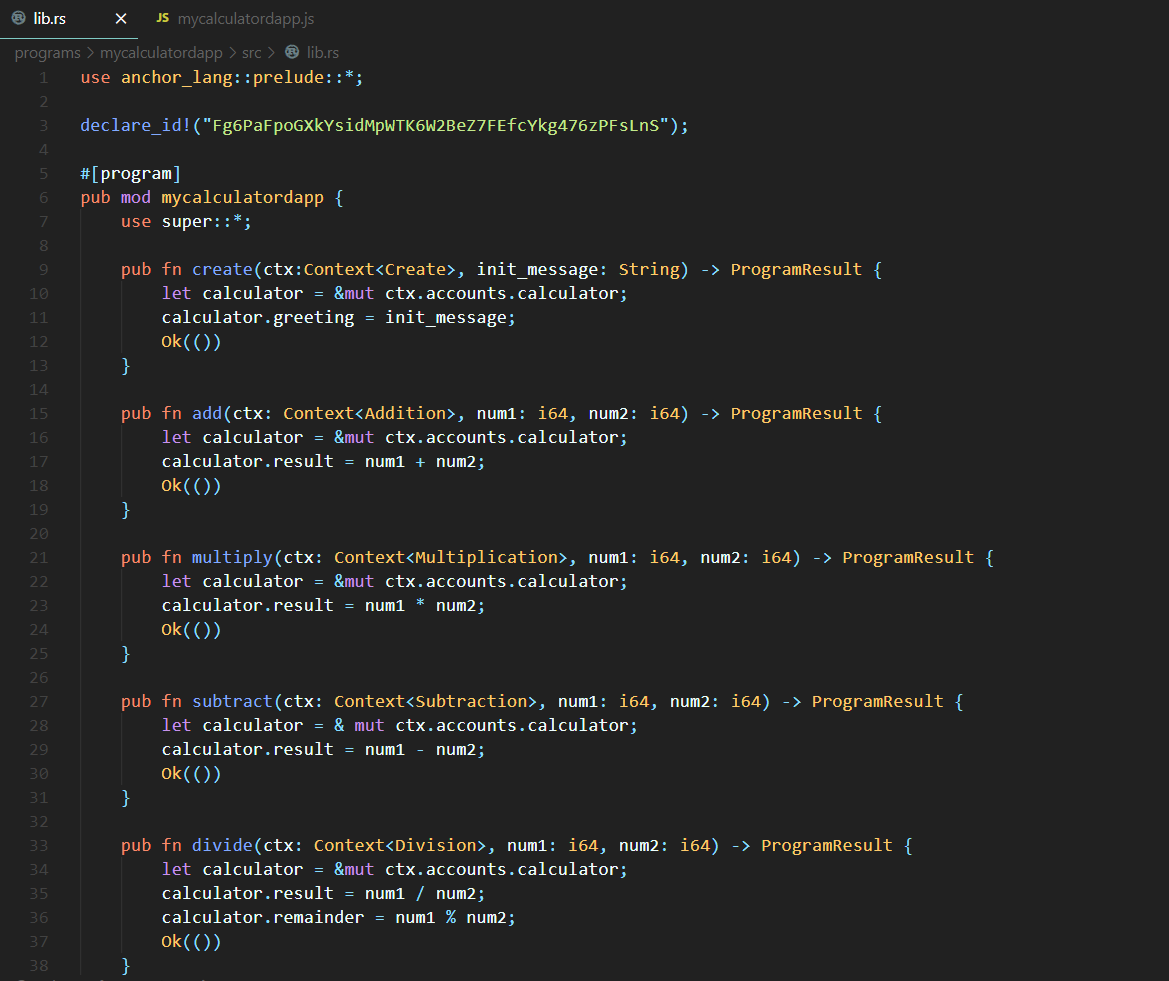
Now let us simply define the function signatures that we will require to code up our calculator dapp without writing the logic yet. The bulk of the program goes in a module under the #[program] macro. We’ll just define them under the pub mod mycalculatordapp and write the logic later. These function definitions would look like this:
    pub fn create(ctx:Context<Create>, init_message: String) -> ProgramResult {

    }

    pub fn add(ctx: Context<Addition>, num1: i64, num2: i64) -> ProgramResult {

    }

    pub fn multiply(ctx: Context<Multiplication>, num1: i64, num2: i64) -> ProgramResult {

    }

    pub fn subtract(ctx: Context<Subtraction>, num1: i64, num2: i64) -> ProgramResult {

    }

    pub fn divide(ctx: Context<Division>, num1: i64, num2: i64) -> ProgramResult {

    }
Here pub means public and fn means function, implying that they are public functions that can be invoked from our program, ie it becomes a client-callable program function. The first argument of these functions is always Context<T> which consist of the solana accounts array and the program ID, which in essence is the required data to call just about any progarm on Solana. The next parameter of both the first function is a String named init_message, which we will be using as our message that is stored on our calculator (think how you see some text every time you boot up your phone, pc, calculator etc). In the other functions, the num1 and num2 parameters are of type integers and are the numbers on which we will be performing our mathematical operations. The ProgramResult is the return type of both these functions, which actually is just an easier method to serve function results and/or errors.
After defining the above functions, your code should look something like this:

Writing the logic for our first Solana program
Now let’s write the logic for the create function first, ok? Let’s first make our intentions clear for this function and the program in general. We want to keep track of three things here. First is the greeting message that we would be storing in our calculator, the second would be the result of all the mathematical operations and third is the remainder, which will be used in case of division, since Anchor currently does not support floating values. So we would want our calculator account (the main account that will handle all the calculation stuff of the program) to have three fields, namely: greeting, result, remainder. Also, since the same account will be used for the calculations and with different parameteres, we would want the calculator account to be mutable, ie, to be able to persist changes. Write the following code logic inside the create function now.
        let calculator = &mut ctx.accounts.calculator;
        calculator.greeting = init_message;
        Ok(())
The Ok(()) syntax is used for error handling of the ProgramResult type. You can think of Ok(()) like a gate, that lets the program continue if there are no errors but sends the program into another state if an error is encountered.
Now, your coding screen should look something like this:

A small note about accounts on Solana
An account is not actually a wallet. Instead, it’s a way for the contract to persist data between calls. This includes information such as the count in our base_account, and also information about permissions on the account. Accounts pay rent in the form of lamports, and if it runs out, then the account is purged from the blockchain. Accounts with two years worth of rent attached are “rent-exempt” and can stay on the chain forever.
Defining the structure of calculator account
In the last sub-quest, we talked about what is our expectation with the calculator account, right? Also, we used the calculator account already in the create function. So, now let’s go ahead and define what actually our calculator account is. As mentioned earlier, everything on Solana is an account, so we will be using the awesome macros of Anchor to convert a struct into our calculator account.
Write the code provided below outside of pub mod mycalculatordapp.
#[account]
pub struct Calculator {
    pub greeting: String,
    pub result: i64,
    pub remainder: i64,
}
With this, your code screen would look something like this:

Good, now you are on track to implement actual functionalities of a calculator. Let’s see how do we do that.
First calculation function logic
With the last sub-quest, we are all set to write the logic for our first calculation function. Let’s write the logic for addition first. As you might be thinking, here we simply have to save the result of the addition of the two parameters in the result field of the calculator account. If you were thinking along that lines, then congratulations, you’re right on the money. Write the following code inside of the add function
        let calculator = &mut ctx.accounts.calculator;
        calculator.result = num1 + num2;
        Ok(())
With this, your coding screen would look something like this:

Notice the Context<Addition? As discussed earlier, it is the list of accounts that must be passed to this particular function for it to run. What accounts do you think would we require to send to this function to make it work? Yes, correct, we only need to send the calculator account, nothing else xD. So, now with this knowledge, let’s define Addition, write the following code below with your declaration of the calculator account:
#[derive(Accounts)]
pub struct Addition<'info> {
    #[account(mut)]
    pub calculator: Account<'info, Calculator>,
}
With this, your coding screen would look something like this:

Congratulations…. now you have a Solana blockchain program that is capable of adding two number…. How cool is that, right? Now I want you to take a pause and re-collect whatever you’ve learnt in the quest uptil now, because the next sub-quest is going to be a challenge sub-quest :D
Challenge sub-quest
This sub-quest is a challenge for you. Trust me, at this moment, you are perfectly capable to write more Solana code by yourself. Keep in mind how we defined the add function and the Addition struct in the last quest and with that knowledge, I want you all to write the code for all the remaining functions, that is, multiply, subtract and divide and then declare the corresponding structs, that is Multiplication, Subtraction and Division.
The only function that will be slightly different would be the divide function, so trust in yourself and give this sub-quest your best shot.
Solution to the challenge sub-quest
I hope that you did your best to try and complete the remaining functions, now you can tally them with the below code.
The code for the multiply function is as follows:
        let calculator = &mut ctx.accounts.calculator;
        calculator.result = num1 * num2;
        Ok(())
The Multiplication struct would look something like this:
#[derive(Accounts)]
pub struct Multiplication<'info> {
    #[account(mut)]
    pub calculator: Account<'info, Calculator>,
}
The code for the subtract function is as follows:
        let calculator = & mut ctx.accounts.calculator;
        calculator.result = num1 - num2;
        Ok(())
The code for Subtraction struct is as follows:
#[derive(Accounts)]
pub struct Subtraction<'info> {
    #[account(mut)]
    pub calculator: Account<'info, Calculator>,
}
And finally, the code for the divide function is as follows:
        let calculator = &mut ctx.accounts.calculator;
        calculator.result = num1 / num2;
        calculator.remainder = num1 % num2;
        Ok(())
The Division struct also looks like this
#[derive(Accounts)]
pub struct Division<'info> {
    #[account(mut)]
    pub calculator: Account<'info, Calculator>,
}
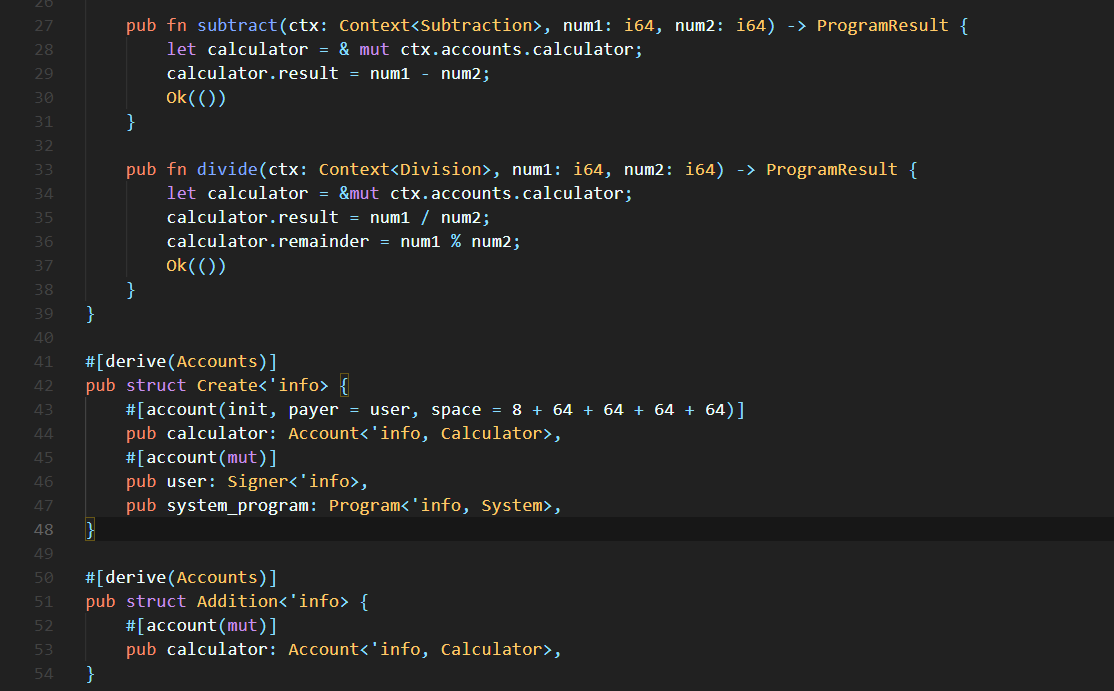
With all this, your coding screen should look something like this:

Did you get them right, or most of them right or even one right? Wasn’t this exciting? You’re able to write Solana code yourself right off the bat.
Now, is our program complete? Sadly no, there is one more, last remaining piece of the puzzle that we must address before we can say that we done with the program coding part. Before jumping onto the next sub-quest, try and guess what could we be missing from our program, and yes, you can guess that. It is within your grasp.
Final piece of the puzzle
If you could guess that we had used the Create struct in the first create function itself but never defined it anywhere like we defined the Addition, Multiplication etc structs, then, congratulations you were absolutely right.
With this struct, we want to pass three accounts, the first is obviously the calculator account, since it is being used in the function itself. The second account is the user account and the third account is the system_program. What makes this struct a bit more special is that, in this struct we have to give the command to actually create the calculator account (which we have used in the subsequent functions). The creation of this calculator account will cost us some money (SOL) which will be paid by the user account that we just mentioned, along with that we have the space parameter where we specify how much space do we require in our account (here, calculator account) and finally the system_program is just system specifications for the Solana blockchain, again in the form of an account.
Write the following code to define the Create struct:
#[derive(Accounts)]
pub struct Create<'info> {
    #[account(init, payer = user, space = 8 + 64 + 64 + 64 + 64)]
    pub calculator: Account<'info, Calculator>,
    #[account(mut)]
    pub user: Signer<'info>,
    pub system_program: Program<'info, System>,
}
As discussed earlier, we used the derive Accounts macro since we had to incorporate 3 accounts here and for all these three accounts individually, we used the account macro. Now onto the arguments used with these macros. The init macro is used to create a new account owned by the current program which is our mycalculatordapp program. Whenever init parameter is used, we must always specify the payer or the account that will be paying for creation of the account on the Solana blockchain, along with the space param which is the space with which the new account is created.
The mut parameter marks an account as mutable, which essentially means our account will be altered and Solana will need to update the data in your account. So, always use the mut parameter for persisting changes.
Another new concept used here is the Signer type. This is used to enforce the constraint that the authority account (messengerapp in this case) signed the transaction.
With this, your coding screen should look something like this:
Further reading:
You can read up on different types of account constraints here.
Testing our calculator program
Head over to tests/mycalculatordapp.js and delete everything that’s written there. We are going to be writing our tests from scratch. The first step would be to import the necessary libraries and constants. To do that, use the following code:
const assert = require('assert');
const anchor = require('@project-serum/anchor');
const { SystemProgram } = anchor.web3;
Now, since we will be using Mocha for testing our programs, we will create the skeleton of where we will be putting our tests. So, basically, how Mocha works is that it takes describe blocks as testing blocks and within those describe blocks there are numerous tests written using the it blocks. So, use the following code to create the skeleton:
describe('mycalculatordapp', () => {
  const provider = anchor.Provider.local();
  anchor.setProvider(provider);

  const calculator = anchor.web3.Keypair.generate();
  const program = anchor.workspace.Mycalculatordapp;

  it('Creates a calculator', async () => {

  });

  it("Adds two numbers", async function() {

  });

  it('Multiplies two numbers', async function() {

  })

  it('Subtracts two numbers', async function() {

  });

  it('Divides two numbers', async function() {

  });
});
With this, your code screen should look something like this:

The additional things that we coded there were the introduction of provider. The provider is the abstraction of a connection to the Solana network. In the test, the Anchor framework will create the provider for us based on the environment (anchor.Provider.local()).
Now, the program is an abstraction that combines the Provider, idl, and the programID (which is generated when the program is built) and allows us to call RPC methods against our program.
The calculator variable you see is the keypair generated using anchor.web3 that we will be using to test our program.
When we have these three things, we can start calling functions in our program, which is what we will be doing in our next sub-quest.
Writing our first test
The method to call the functions of our program is pretty straight-forward. We will use the program RPCs (Remote procedure calls) to access the function and then we will use the web3.js library to create accounts which have to be passed as the parameters to those functions. Let’s first jump into the code of our first test and see things in action.
  it('Creates a calculator', async () => {
    await program.rpc.create("Welcome to Solana", {
      accounts: {
        calculator: calculator.publicKey,
        user: provider.wallet.publicKey,
        systemProgram: SystemProgram.programId,
      },
      signers: [calculator]
    });

    const account = await program.account.calculator.fetch(calculator.publicKey);
    assert.ok(account.greeting === "Welcome to Solana");
    _calculator = calculator;
  });
Now, what we have done in the code above is simply create a calculator account by generating a new account using the web3 library. Then using the program RPC, we have called the create function and to that function we have supplied the required parameters, which were the calculator, user, systemProgram and the init_message string.
After this function is run, we simply grabbed hold of the calculator account and checked it’s greeting field and verify whether it has changed to Welcome to Solana or not. After that we save the calculator account in a variable called _calculator so that it can be referenced later.
With this, your code screen would look something like this:

Writing our second test
With this second test, we begin testing the calculations of the Solana program that we wrote. Firstly, we will write the test for the correct functioning of the add function and then with that as the inspiration, the next sub-quest will be a challenge sub-quest where the learner will write the tests for multiply, subtract and divide. For testing, we cannot directly use numbers and we will therefore have to cast them into Anchor big numbers. Now, write the code below to test the add function of our mycalculatordapp program.
  it("Adds two numbers", async function() {
    const calculator = _calculator;

    await program.rpc.add(new anchor.BN(2), new anchor.BN(3), {
      accounts: {
        calculator: calculator.publicKey,
      },
    });

    const account = await program.account.calculator.fetch(calculator.publicKey);
    assert.ok(account.result.eq(new anchor.BN(5)));
    assert.ok(account.greeting === "Welcome to Solana");
  });
It is very similar to the test we wrote in the last sub-quest with the only changes being that we are supplying 2 and 3 as the numbers to be added and passing the list of accounts as per the Addition struct which requires only the calculator account. After the add function is run using the RPC, we fetch the calculator account and check the fields of the calculator account. The greeting field should remain unaffected and still be “Welcome to Solana”, along with that the result field should now be equal to the sum of 2 and 3, ie, 5.
That is all that was required to test the add function. With this, your coding screen should look like this:

Challenge sub-quest
As discussed in the previous sub-quest, in this sub-quest you are required to come up with the tests for the multiply, subtract and divide functions by yourself. You can take inspiration from the earlier two tests we wrote and trust me when I say that you can very easily write the tests for these three functions too. All you need to do is make sure that the entire quest uptil this point was clear to you.
All the best.
Solution to the challenge sub-quest
I hope that you gave your best attempt to the challenge in the last sub-quest and now let’s tally what you’ve written with the tests can be. The values of the parameters (num1 and num2) being passed can change, make sure you are writing your assert statements accordingly.
Here’s the code for the multiply function check:
  it('Multiplies two numbers', async function() {
    const calculator = _calculator;

    await program.rpc.multiply(new anchor.BN(2), new anchor.BN(3), {
      accounts: {
        calculator: calculator.publicKey,
      },
    });

    const account = await program.account.calculator.fetch(calculator.publicKey);
    assert.ok(account.result.eq(new anchor.BN(6)));
    assert.ok(account.greeting === "Welcome to Solana");
  })
Here’s the code for the subtract function check:
  it('Subtracts two numbers', async function() {
    const calculator = _calculator;

    await program.rpc.subtract(new anchor.BN(32), new anchor.BN(33), {
      accounts: {
        calculator: calculator.publicKey,
      },
    });

    const account = await program.account.calculator.fetch(calculator.publicKey);
    assert.ok(account.result.eq(new anchor.BN(-1)));
    assert.ok(account.greeting === "Welcome to Solana");
  });
Here’s the code for the divide function check:
  it('Divides two numbers', async function() {
    const calculator = _calculator;

    await program.rpc.divide(new anchor.BN(10), new anchor.BN(3), {
      accounts: {
        calculator: calculator.publicKey,
      },
    });

    const account = await program.account.calculator.fetch(calculator.publicKey);
    assert.ok(account.result.eq(new anchor.BN(3)));
    assert.ok(account.remainder.eq(new anchor.BN(1)));
    assert.ok(account.greeting === "Welcome to Solana");
  });
Wasn’t this exhilarating? You’ve only just started with Solana development and now not only can you just write program functions on your own, you can also write tests to verify their functioning. Isn’t this seriously mind-blowing? Anyway, congratulations on this feet and just tally your code with the code snapshot below and after which we move onto actaully running these tests.


Running the tests
Now, that we are done running all the tests, make sure that your local validator is not running. That means make sure that the solana-test-validator process is not running and the network is set as localhost by inspecting the results of solana config get. Once all this is done, it is time for us to actually test the progarm that we wrote. To do that use the following command:
anchor test
If all the tests pass, you’ll get a screen similar to this:

If you get some errors, try debugging those using the error messages you get. Make sure you have accurately followed the code presented in the quests and you are on the same Anchor version as that followed in the quest (0.17.0). With that you’ll find your way out of most of the errors that you might run into.
Congratulations
Congratulations on succesfully creating your own calculator on the Solana blockchain and testing its functioning :D
Next steps
Now you’ve dipped your toes in the ocean of Solana development. To learn more about it, you can try and mess around with the data types that we used in the function declarations and see what effect does that have on the program; you can try to use just one struct in place of the Addition, Multiplication, Subtraction and Division struct since they were all similar. You can try to combine all the four calculator functions into one function where the operation is decided using the parameter passed, and apart from this you can experiment with the contents of this quest to your heart’s content and then you can move onto the other quests on Solana development.